I’ve been interested in Microsoft Graph for some time now but never really had an opportunity to work it into a customer solution.
Recently an opportunity presented itself to put it to use. Creating a visitor booking in application. The application was built using Blazor (Server Side) with Telerik components and has a SQL Server Databases on the backend to store visit information.
The requirement was a simple one. Record some visitor information, agreement to Health & Safety policy, select an employee and notify that employee that a visitor has arrived to see them. As this blog post is about Microsoft’s Graph, I’ll keep the details to just that.
Getting Started
To get started we’ll need to download the Microsoft.Identity.Client Nuget package into our project. This will allow us to create the ConfidentialClientApplicationBuilder to generate a token to pass in the request headers when we communicate with the Graph.
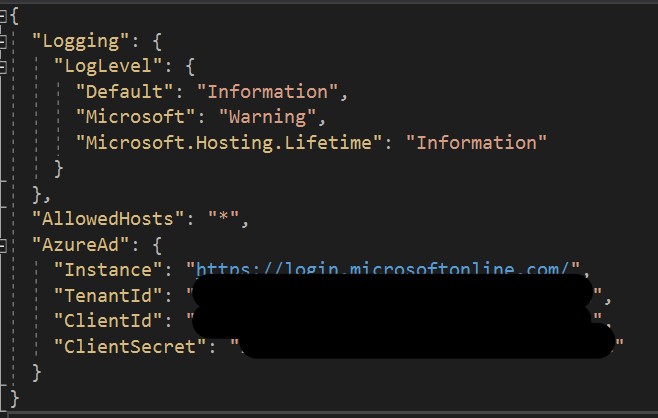
Next, we’ll need to store a reference to our authentication authority (https://login.microsoftonline.com/), Tenant ID, Client ID and Client Secret. For the purpose of this application as it’s internal to us, we’ll store the details in our appSettings.json file. For any customer-based applications we would be storing these details in the Azure Key Vault.
To get the Tenant ID, Client ID and Client Secret details we’ll need to register a new App Registration in the Azure Portal.
App Registrations
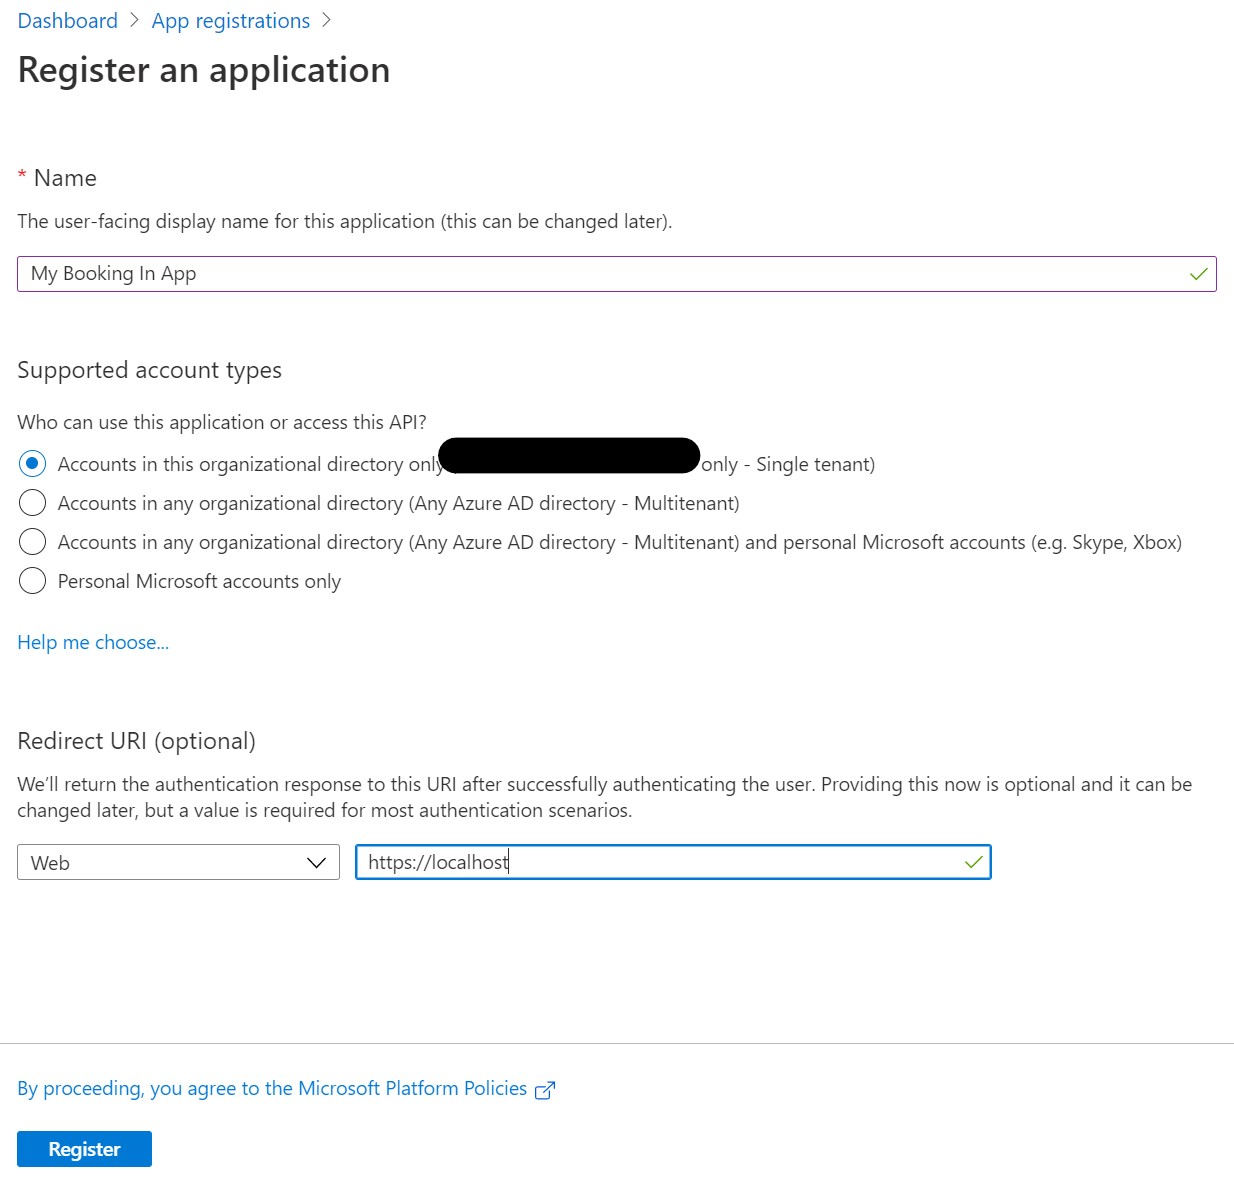
To register a new App Registration, at the top of the Portal search for the App Registrations resource, select it and then click “+ New Registration”.
You’ll then need to enter a few details.
We’ll give our App Registration a name e.g. “My Booking In App”.
As this application is for internal use only, we’ll leave the default of “Accounts in this organizational directory only (Single tenant)”.
For the Redirect URI, we’ll add in https://localhost/ for now. This will help whilst we test the application in development. The Redirect URI is the path that you want to come back to when you have successfully authenticated.

Now that we have our App Registration, there are a few more steps to get us ready for connecting to the Graph.
Within the App Registration, we’ll select Authentication. Here we need to make sure that the “ID tokens” is checked under Implicit grant.
Next, we’ll need to create a Client Secret. Under Certificates & secrets, click “+ New client secret. Give the secret a description, set the expiration value; in our case we selected “Never”. Clicking Add will generate a new secret for your App Registration. Make sure to note this down as you won’t be able to view it again when you move away from the page.
Finally, we’ll configure the API we wish to utilise for our application. In this case, Microsoft Graph.
Under API Permissions, select “+ Add a permission”.
Select Microsoft Graph.
You’ll then be asked to choose what type of permission your application requires; either Delegated (accessing the API as a signed-in user) or Application (no signed-in user). As our application will be standalone, we’ll select Application permissions.
In this instance we only need access to the Users’ full profiles, so let’s filter the list by User. Under the User option. Select “User.Read.All”. This is all we need for this application. Admin consent will be needed for this permission. All you need to do is click “Grant admin consent for…” – you will need admin privileges within the tenant to do this.

With that done, we’ll make note of our Tenant (Directory) ID and Client (Application) ID. You’ll find this under the Overview section of the App Registration. Now with our authentication authority (Instance), Tenant ID, Client ID and Secret, we’ll add those to our appSetting.json file.

How to connect to the Graph
For this application we used the HTTP Client to connect to the Graph.
First, we’ll need access to our appSettings.json file to get our Tenant ID etc.
IConfigurationRoot configuration = new ConfigurationBuilder()
                .SetBasePath(AppDomain.CurrentDomain.BaseDirectory)
                .AddJsonFile("appsettings.json")
                .Build();

var auth = configuration.GetSection("AzureAd").GetSection("Instance").Value;
var tenantId = configuration.GetSection("AzureAd").GetSection("TenantId").Value;
var clientId = configuration.GetSection("AzureAd").GetSection("ClientId").Value;
var clientSecret = configuration.GetSection("AzureAd").GetSection("ClientSecret").Value;
We’ll then generate our Authentication URI which will be used in our ConfidentialClientApplicationBuilder.
Uri authority = new Uri($"{auth}{tenantId}");
We’ll now create our ConfidentialClientApplicationBuilder to help generate our token to pass in the headers of our HTTP request.
IConfidentialClientApplication confidentialClient = ConfidentialClientApplicationBuilder
                    .Create(clientId)
                    .WithAuthority(authority)
                    .WithClientSecret(clientSecret)
                    .Build();
Next, we need to set our scopes. For this we’ll just set the scope to .default. As per Microsoft’s Docs – “A scope value of https://graph.microsoft.com/.default is functionally the same as the v1.0 endpoints resource=https://graph.microsoft.com - namely, it requests a token with the scopes on Microsoft Graph that the application has registered for in the Azure portal”.
var scopes = new string[] { "https://graph.microsoft.com/.default" };
We can now request our Access Token.
AuthenticationResult result = await confidentialClient.AcquireTokenForClient(scopes).ExecuteAsync();
With the token in hand, we can now create a new HTTP Client.
HttpClient _httpClient = new HttpClient();
With our new HTTP Client, we’ll pass the token in the header of the request.
_httpClient.DefaultRequestHeaders.Authorization = new System.Net.Http.Headers.AuthenticationHeaderValue("Bearer", result.AccessToken);
From there, we’ll now be able to call into the Graph and call the APIs we need.
For our application we needed the Direct Reports of a Manager (details in the resources below) and the photos of those Direct Reports (also detailed in the resources below).
To get the Direct Reports we call:
var managerReportsRequest = await _httpClient.GetAsync("https://graph.microsoft.com/v1.0/users('" + managerEmail + "')/directReports");
We’ll then read out and parse the response to get all the Employees in our company:
var managerReportsData = System.Text.Json.JsonDocument.Parse(await managerReportsRequest.Content.ReadAsStreamAsync());
var userArray = managerReportsData.RootElement.GetProperty("value").EnumerateArray();
Looping through the employees (userArray) we can then pull out details like Id, displayName, mail e.g. GetProperty(“id”).GetString();
With the Id, we can then do things like, grab the employee’s photo to show on the Select Employee screen:
var photoRequest = await _httpClient.GetAsync("https://graph.microsoft.com/v1.0/users('" + userId + "')/photo/$value");

if (photoRequest.IsSuccessStatusCode)
{
    var photo = await photoRequest.Content.ReadAsByteArrayAsync();

    if (photo != null)
    {
        string base64String = Convert.ToBase64String(photo, 0, photo.Length);

        emp.EmployeePhoto = string.Format("data:image/png;base64,{0}", base64String);
    }
}
Notifying the Employee
To notify the employee that a visitor had arrived we used Power Automate and Flow Bot for Teams to send an @mention message into a Teams Channel. If anyone is interested in how we did this, you can DM me on Twitter or drop me an email at kev-the-dev@outlook.com.
Summary
In summary, connecting into Microsoft’s Graph was real easy and there is a vast amount of documentation on it at https://docs.microsoft.com to help you get started. I just thought it useful to document our dalliance with the Graph.
Am I a Graph believer? You bet I am. The possibilities are endless, and we’ve already built a holiday/vacation Blazor application too that hooks into the Graph!
Resources
Register an application with the Microsoft Identity Platform